Thursday, December 3, 2009

Stay at Home Make


We will not be having a make for the month of December so instead I thought I would share a recipe for an easy stay-at-home-make; SNOW ICE CREAM!

This might gross out some of you because it involves eating real fallen snow. If you're like me, however, as long as it's not yellow, I don't do much to stop my kids from a chomping on few flaky handfuls. I learned this recipe from my mom who made it for me a many snowy days when I was a kid.


You will need:
  • fresh, clean snow
  • milk
  • sugar
  • vanilla

I did no measuring but if you want to be precise the internet is full of recipes. I added milk to the snow until it became the consistency of soft seve ice cream then I added sugar and a bit of vanilla...time for a taste test...you might need a little more sugar, milk or vanilla...it's up to you. Enjoy!
P.S. Paula Deen's recipe contains sweetened condensed milk in place of milk and sugar! I haven't tried it yet but I am pretty much game for any recipes involving condensed milk.

Wednesday, December 2, 2009

Activity Advent


We decided to count down the days until Christmas with an activity-advent calendar to go along with our chocolate one.


I inserted a to-do item in each miniature box (found at a paper warehouse for 40 cents each). Then I wrapped each box with tissue, ribbon and feathers.


Each day Hendrix will find the number of the day and unwrap to revel the activity.


Today we will string popcorn for a little extra Christmas tree decor. Here's what is to come:
  1. Set up Christmas tree and arrange Christmas decorations
  2. String popcorn for the tree
  3. Learn a Christmas song
  4. Nativity puppet songs and stories
  5. Reindeer Hats Craft
  6. Take pictures in a homemade photo booth
  7. Write a letter to Santa Clause
  8. Homemade Marshmallows
  9. Create Christmas cards and mail them
  10. Look through toys and find something to donate
  11. Bake and decorate gingerbread people
  12. Take a Christmas surprise to the neighbors
  13. Make ice ornaments for the great outdoors
  14. Play a holiday game
  15. Paint snowflakes on the window with window paint
  16. Get on an airplane to visit family
  17. Disneyland
  18. Disneyland
  19. Watch Christmas claymation movie
  20. Make snow ice cream
  21. Neighborhood Christmas lights tour
  22. Open Christmas eve gift (ornament)
  23. Hooray! It's Christmas!

Monday, November 30, 2009

Nativity Puppet


I just thought I'd share this handy way of telling the Christmas story...get it...handy? (He-he). The whole thing is made from felt and a one-size-fits-all glove. Of course you can adjust the characters as you see fit on your own glove. It also makes a great (frugal) gift for the kiddies.

Friday, November 27, 2009

Well Fed Villagers


I must say that the stone soup activity we had this month might be my favorite make to date—definitely in the top 3!

The kids became the town villagers as they participated in telling a version of the Stone Soup story by placing pictures of veggies in our paper pot.


After that we made the real thing starting with just a few large stones. Everyone contributed by adding their own ingredient to the pot (pics don't do justice).


I have to admit, I really wasn't sure we would have enough veggies to make a substantial pot of soup but the veggies just kept coming and coming before we knew it we had a feast of a meal that was actually pretty friendly to our taste buds!


Thank you to everyone for the fabulous and tasty make!

Thursday, November 12, 2009

Stone Soup

( image from etsy seller ForEvelyn)

For the make this month, I thought we could get cozy with some yummy stone soup. What is stone soup you ask? Why, it's soup make from stones of course...(and maybe a little magic sprinkled about for flavor)!

We will read a version of the story Stone Soup, which tells the fable of a small group of poor villagers who work together to build a delicious soup that ends up feeding their once starving town. After reading the story we will all participate in making our own soup starting with just a stone. Each child will have the opportunity to add their own ingredient (which they will have brought from home) to the pot.

While the soup simmers the children will either color their own "stone soup" coloring sheets or they can participate in a little free play. When the soup is ready we will all sit together for a lovely stone soup lunch date!

I will also provide bread, crackers and cheese, as a soup side—you really don't want to miss this one! See you there.

LET'S MEET: In the church kitchen, Friday the 20th of November at 11am

FEES SHMEES: In place of cash this month please bring an item or two from the grocery list below. Please prep food items if necessary (wash, cut, chop, etc).

RSVP: On or before the night of Wednesday the 18th of November please leave a comment on this post or by email (see sidebar). If possible, please share what food item you are planning to bring.

GROCERIES: If you would rather bring an item that is not on the list...that is fine too! Here are some options...
  • 6 red potatoes (cut in slices about 1/4-1/2 thick)
  • 3 carrots (peeled and sliced)
  • 1 zucchini (sliced)
  • 1 summer squash (sliced)
  • 1 onion (diced)
  • 3 cloves garlic (mashed through a press)
  • 1 stalk celery (sliced)
  • 1/2 bell pepper (sliced/diced)
  • 1 cup green beans (thawed if frozen)
  • 1 large tomato (chopped up)
  • 1/2 cup peas (thawed if frozen)
  • 1/2-1 cup corn (thawed if frozen)

Friday, November 6, 2009

Little Pearl, Little Pearl, Let Me In!

Here is a great anytime make brought to you by our friend Pearl and her mom Natalie. All kids and bunnies know that boxes make the best toys.


By the way, one day when Grammy came to visit, I learned that the container store has some great options for house making. My mom purchased 2 over sized corrugated white boxes for for Hendrix that supplied him with months of fun (you can even fold them flat for storing)! I think they were something around $5 each. So, if you haven't made any big-boxed purchases lately, and you're in the market for some kiddie real estate, check out the container store.
(photos from Natalie's original post HERE).

Monday, October 26, 2009

Pretty Pumpkin Recap


If you weren't busy eating glue then you were using it to decoupage tissue paper onto little pumpkins!


To make these at home for your autumn decor, here is Charissa's 'pretty pumpkin' recipe:
  • we-be-little pumpkins which you will cover with squares of torn...
  • tissue paper using...
  • white glue (thinned with water) and fingers or craft sponge. Top it off with some...
  • glitter (optional)
Thank you Charissa for putting on such a great autumn time make!

Friday, October 23, 2009

Paper Crafting; Spooky Style

We have been doing some Halloween paper crafts recently and below is a sampling of our efforts.
Skull and Crossbones Vertical Garlands:


These were made using 3 craft punches; a large circle, small circle and skull with crossbones. We assembled with a glue stick and craft thread. (Thread was glued between two circles, making it double sided).
This would be a great thing to hang in a doorway or better yet, use it as the backdrop for a Halloween photo booth.


Candy Corn Bunting:
No worries if you don't like candy corn—these ones are non-edible. We glued orange and yellow strips of paper on a sheet of white paper then I cut out triangle shapes. After that I smoothed the corners with a round corner punch. Before stringing all of them up on some craft thread, I went over the sides and corners of the candy shape with a brown pastel and cotton ball. Dulling down the bright card stock helped to sophisticate this embellishment just a bit—it candy corn can be sophisticated! I intentionally made this bunting from paper rather than fabric to save time but I think (even I) could have moved faster whipping it through the sewing machine had I used fabric. Oh well, fabric I didn't have and paper I did.


Halloween Badges:


The same skull and crossbones punch was used here. The rest was freehand. I basically followed a tutorial I got from HERE. It's SOOO easy and customizable by size. Wouldn't this be a cute prize to give out at a children's Halloween party? Otherwise you could use it as a little emblem to accompany your little one's costume on Halloween night. If your kids are anything like mine, they will just want to wear them around the house for fun, which is actually what we made these for very early in the month (that explains the tattered look of the ones pictured here). To make these badges wearable I hot glued a safety pin on the back. Fabric ones might be even cuter and you could use them year after year!


Projects like these are nice because I feel like they are a usable crafts, meaning they won't just go in the trash the next day and since I am definitely the one leading in tasks like these, Hendrix gets to be the 'big helper' by punching, sorting, and gluing or hold the pieces while I glue.

Thursday, October 22, 2009

Innards

Okay…labeling this project with something like ‘innards’ might be a little much for the preschool variety. I suppose you can change the name of this homemade slime-like substance to ‘Halloween Goop’ or ‘Ghoulish Goo’ really anything that doesn’t cause your youngster to imagine they are rolling their fingers around in inner body sludge! I am assuming though, that they are not the ones reading this so I am going to give you a recipe for innards.

You will need two ingredients; corn starch and water (oh and food coloring if you wish). This combination creates a really neat effect, giving you a putty that is sort of in-between a liquid and a solid. I thought a video demo would do more justice than pics so I have attached one here. Don't be scared when you see how messy we are in the video, we had been playing with it for quite some time—like an hour!


I did not measure out my ingredients, I just tested until it was the right consistency but if you are particular about that sort of thing, I’m sure you can find something online. This might be fun to combine with other Halloween sensory fun like peeled grapes for eye balls or wet spaghetti for brains...you get the idea.

Wednesday, October 21, 2009

Creatures of the Night

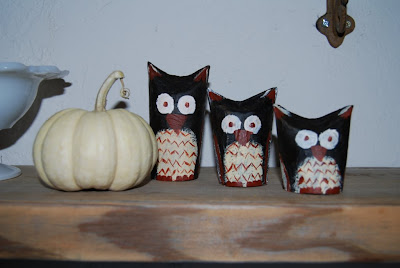
Here is a little indoor décor project for your Halloween celebration. Would you guess that these creatures of the night are made from toilet paper rolls?


I snatched this project up from Matsutake which has all the instructions. (You have to check out her, Where the Wild Things Are creatures—they are to die for!)

The original instructions called for paint but we are about out of the washable kind so we ended up covering our base in tissue paper and watered down glue. This actually worked to our benefit because after it dried the ‘body’ became very hard and will likely never tear. I painted the faces using acrylic paint while Hendrix was painting his pumpkin rocks.


I hope you try this at home, the possibilities are endless!
P.S. Today the crafty crow posted a felt pumpkin game like the one i posted earlier with a spinner even! Check it out.

Tuesday, October 20, 2009

Head Shrinking

Every good witch and warlock knows how to shrink a head! So this month we thought we would test out our spell casting and potion making by shrinking our own heads…well, not OUR own heads but heads we own…apple heads.


This project usually pops up all over the place around this time of year and I have always wanted to try it. All the potions (or recipes) that I looked at called for the same basic ingredients; apples, lemon juice with salt, a carving utensil and stick or something to let your apple heads dry on.
The Martha Stewart instructions are adamant about using green granny smith apples, which we didn’t do and I am thinking that is why our heads shrunk down to the size of large prunes…or maybe we are just really good at shrinking heads! If you don’t want to risk it though, you might want to listen to Martha and go with the grannies.


We started this project almost 3 weeks ago and let them air dry. I didn’t mind because supposedly they last forever and Hendrix had fun monitoring the progress every day. I have heard, however, that you can put them in the oven on low heat to speed the process.


Today when we went to hang our now prune sized shrunken heads, they looks a little lonely so we went on a nature walk to gather up a few more supplies.


Then we made a shrunken head mobile and hung it at our front door.


Hendrix is eager for the neighborhood squirrels to make an attempt in eating our apples until they realize they can’t because the mobile is actually hanging behind the glass. I think he thought that was the funnest or at least funniest part of the whole project! A little too much AFV maybe?

Monday, October 19, 2009

Imposter Pumpkins!

To kick off our week I am going to post a two-in-one for your Monday morning. The following two projects are perfect if you would rather stay inside and drink cocoa rather than brave the cold, if you have to stay inside because you have sick ones at home or perhaps both!

Imposter Pumpkin Project 1: Pumpkin Patching
After cutting out a few pumpkin-like shapes from some orange felt, along with a few stems, leaves and face shapes, your little ones can sit for hours (or at least a good 10 minutes) patching together silly and scary pumpkin characters.


For ours I actually used scraps of orange felt for little pumpkins. From the black felt I cut out all the standard shapes as well as some more defined shapes for expression. The learning bonus to this activity is shape recognition, understanding emotions, self expression and imagination.


Avi (18 months) liked to stack the shapes on the pumpkin base whereas Hendrix (3 years) and I made a game by taking turns spinning for our facial features. On a blank spinner that I got in a 4-pack from the $1 store I filled in all the required parts; eyes, nose, stem, accessories, etc. Below are the results from our first game.


Imposter Pumpkin Project 2: Just-Try-to-Smash-Our Pumpkin Pumpkins
This activity was inspired by one of Hendrix favorite books (Halloween or not), called The Pumpkin Smasher by Anita Benarde. If you can find a copy of this 1972 'weekly reader', you could combine the project with the literary reference.


In the book a small town’s pumpkins are being attacked by an unknown pumpkin smasher. The problem gets so bad that the adults consider canceling Halloween until a brother and sister duo paint a giant rock to look like a pumpkin as a trick for the smasher. The pumpkin smasher (aka witch) is fooled and can not smash the rock pumpkin. In result she vows to never return to the town again.


We used acrylic paint on our rocks because we knew they were going as part of our outdoor décor. Hendrix painted the faces on using a black paint pen, but I think a sharpie would work great too.


You don’t have to stop at pumpkins of course, maybe your more lengthy rocks could be a Frankenstein or a skull with cross bones!


Related Posts with Thumbnails