Showing posts with label In the Kitchen. Show all posts

Tuesday, October 2, 2012

Halloween Crafting (Rewind) Week: Pumpkin Potato-Prints


If you like simple crafting projects with very little set-up and clean-up then this project is for you.
With 4 simple ingredients your kids can create their own jack-o-lantern characters to adorn your walls for a little Halloween spirit. 


You will need:
Potato halves
Orange Paint (we use a liquid tempera paint because it's washable)
Paper to print on
Paint pens or sharpies to give your pumpkins stems and character

I think you can figure out the step-by-step from the pictures alone (in spite of really bad lighting) but I will explain my process because I do have a couple tips.


I started by cutting 3 washed potatoes in half, drying off the exposed potato with a paper towel so the paint could stick and then I set them on a plate filled with orange paint. I also cut a bunch of strips of paper from a large pad of newsprint I had lying around. Next, each child grabbed a potato and began stamping their paper, it takes a few tries to figure out the right about of paint needed for each print.  


Since this project is so easy, my kids jammed through about 6 sheets each, printing about 6 pumpkins on one sheet in a very short amount of time (my kids were 3 and 5 at the time). The paint we used dried pretty quickly at which point the kids began coloring faces on their pumpkins using paint pens (you could use markers, they just have to be dark enough to color over the orange paint). Hang up your prints and throw out the potatoes, that's all there is to it!


Oh yeah, make sure you write the child's name on the paper before printing. All the artwork comes out looking very much the same and it will be hard to remember what paper belongs to what artist (obviously this won't matter to you if you're not working with more than one crafter). Also,  if you think you might want to keep any of the artwork on a long term basis, you should use a nice study paper that can handle thick paint. I used newsprint because I expected I would throw these out shortly after my kids completed the project but some of them turned out so cute I would have framed them to add to our collection of Halloween decor. As you can see above, the newsprint paper wrinkled quite a bit. Other than that, there's not much else to say. Happy Crafting.

Check out some of our other Halloween crafts HERE.
Friday, October 15, 2010

U is for Upsidedown Umbrella


We made this Umbrella U using:
Chipboard cut from a cereal box for letter base
Patterned scrapbook paper
Scrap of silky fabric
Brown pipe cleaner
Glue: stick and hot


Umbrella Related books we like:

The Rain Stomper written by Addie Boswell and illustrated by Eric Velasquez is an enjoyable rainy weather read. The little girl in this story is ready to lead the neighborhood parade but faces major disappointment when bad weather has takes over the town. She is determined not to let mother nature rain on her parade (he-he) however, and decides to make the rain part of her performance so the show can go on.


Thunder Cake by Particia Pollacco is a book with an emphasis on the roaring thunder rather than umbrellas and rain but I couldn't leave it off the list. The girl in this story has a fear of thunder but her grandmother has a way of calming her nerves by distracting her as they collect ingredients for a thunder cake (a cake made specifically for thunderstorm weather). We happened to be having stormy weather the first time we read this book so my kids were very intrigued by the tale. After finding the Thunder Cake recipe at the end of the book we headed straight the the kitchen to make our own. It made for the perfect play-date activity on a rainy day.


Lastly, for the wee ones, Who Likes Rain by Wong Herbert Wong is a cute little rhyming book about girl who explores her neighborhood on a rainy day. She discovers not everyone likes the rain. Super simple read, nice for very young readers.

(More about Project ABC)

Tuesday, May 4, 2010

Silly Dogs


The ‘going bonkers’ scale was shooting through the roof today at our house. You’d think these kids were snorting sugar or something. When lunch time rolled around they were way too goofy for a standard PB&J so instead we made silly dogs!


We made this delicacy by inserting dry spaghetti noodles into cold hot dogs and then boiled them until the noodles became soft. To my surprise and delight, having them prepare their own lunch calmed them down enough to actually eat it which means we will be making this meal again. The kids claimed to love the taste too; I’ll stick with the PB&J myself, thank you!

Friday, February 19, 2010

Very Literal Love Notes


We pulled out the origami paper, alphabet stamper and ink to create some very literal love notes for Valentine’s Day.

This was the easiest valentine project ever since Hendrix (age 4) was able to create these notes all by himself by stamping the simple message, “love” on some pretty paper.


In each envelope he also added two heart shaped crayons which we made from old broken crayons, a silicone heart mold and oven.


(For our size of mold it took about 35 minutes for the crayons to melt down entirely with the oven set at 250 degrees).

Although valentines is over the message and crayons live on. Send your sweetie a love note today!

Thursday, February 18, 2010

Sweet Talk: DIY Conversation Hearts

After purchasing our customary bag of conversations hearts for this month of love, I began to wonder how much research it would take to come up with a homemade version of these little candy treasures.

I decided to ask internet to help me investigate the possibilities of this task. As usual, Internet came throughand provided me with the perfect
recipe and photo tutorial for making these famous treats from scratch.

I helped Hendrix and a little girlfriend of his make these over the Valentines weekend but I think it would make a fun anytime kitchen activity.

To MAKE THESE at HOME you will:

Mix ½ cup of water and 2 tsp of light corn syrup to one packet or 2 tsp of unflavored gelatin until the gelatin is well-distributed. Microwave the mix for 30 seconds to dissolve the gelatin, stir well.

Add gelatin mixture to a mixing bowl along with 1 cup of powdered sugar. Mix ingredients using the paddle attachment (you can also use a handheld mixer). When the sugar is well blended you will add another cup of powdered sugar and mix until well-blended again. Continue this process until you have added 2 lb of powdered sugar. The dough should be stiff at this point.

Next you will knead the sticky dough on a generously-dusted powdered sugar surface. Roll the dough over itself adding powdered sugar as needed to decrease the stickiness.


When the dough is the right consistency, you can add color and flavoring. We separated our dough into 5 balls for 5 different colors and flavors. We added the color first (lightest color first) and then we added the flavoring extracts using what we had on hand; vanilla, coconut, bubblegum, banana, and cinnamon. The flavoring possibilities are endless.


Finally you will roll your dough and cut using small heat shaped cutters. You can make as thick as you like but you may want to roll out a thinner version of the store bought candy if your cutters are large.


You can place cut out candies on a cookie sheet lined with parchment. Leave treats uncovered on cookie sheet overnight to dry—NO baking necessary!


Once dried you can add you own special message to each heart using food writing makers which you can find in the baking aisle at most craft stores.
If you didn't notice, the ingredients and supply list for this project are the items are in color above. For further details see recipie HERE.

There you have it, your very own conversation hearts!


(top image credit: Brittany...my sister!)

Thursday, December 3, 2009

Stay at Home Make


We will not be having a make for the month of December so instead I thought I would share a recipe for an easy stay-at-home-make; SNOW ICE CREAM!

This might gross out some of you because it involves eating real fallen snow. If you're like me, however, as long as it's not yellow, I don't do much to stop my kids from a chomping on few flaky handfuls. I learned this recipe from my mom who made it for me a many snowy days when I was a kid.


You will need:
  • fresh, clean snow
  • milk
  • sugar
  • vanilla

I did no measuring but if you want to be precise the internet is full of recipes. I added milk to the snow until it became the consistency of soft seve ice cream then I added sugar and a bit of vanilla...time for a taste test...you might need a little more sugar, milk or vanilla...it's up to you. Enjoy!
P.S. Paula Deen's recipe contains sweetened condensed milk in place of milk and sugar! I haven't tried it yet but I am pretty much game for any recipes involving condensed milk.

Friday, November 27, 2009

Well Fed Villagers


I must say that the stone soup activity we had this month might be my favorite make to date—definitely in the top 3!

The kids became the town villagers as they participated in telling a version of the Stone Soup story by placing pictures of veggies in our paper pot.


After that we made the real thing starting with just a few large stones. Everyone contributed by adding their own ingredient to the pot (pics don't do justice).


I have to admit, I really wasn't sure we would have enough veggies to make a substantial pot of soup but the veggies just kept coming and coming before we knew it we had a feast of a meal that was actually pretty friendly to our taste buds!


Thank you to everyone for the fabulous and tasty make!

Thursday, October 22, 2009

Innards

Okay…labeling this project with something like ‘innards’ might be a little much for the preschool variety. I suppose you can change the name of this homemade slime-like substance to ‘Halloween Goop’ or ‘Ghoulish Goo’ really anything that doesn’t cause your youngster to imagine they are rolling their fingers around in inner body sludge! I am assuming though, that they are not the ones reading this so I am going to give you a recipe for innards.

You will need two ingredients; corn starch and water (oh and food coloring if you wish). This combination creates a really neat effect, giving you a putty that is sort of in-between a liquid and a solid. I thought a video demo would do more justice than pics so I have attached one here. Don't be scared when you see how messy we are in the video, we had been playing with it for quite some time—like an hour!


I did not measure out my ingredients, I just tested until it was the right consistency but if you are particular about that sort of thing, I’m sure you can find something online. This might be fun to combine with other Halloween sensory fun like peeled grapes for eye balls or wet spaghetti for brains...you get the idea.

Tuesday, October 20, 2009

Head Shrinking

Every good witch and warlock knows how to shrink a head! So this month we thought we would test out our spell casting and potion making by shrinking our own heads…well, not OUR own heads but heads we own…apple heads.


This project usually pops up all over the place around this time of year and I have always wanted to try it. All the potions (or recipes) that I looked at called for the same basic ingredients; apples, lemon juice with salt, a carving utensil and stick or something to let your apple heads dry on.
The Martha Stewart instructions are adamant about using green granny smith apples, which we didn’t do and I am thinking that is why our heads shrunk down to the size of large prunes…or maybe we are just really good at shrinking heads! If you don’t want to risk it though, you might want to listen to Martha and go with the grannies.


We started this project almost 3 weeks ago and let them air dry. I didn’t mind because supposedly they last forever and Hendrix had fun monitoring the progress every day. I have heard, however, that you can put them in the oven on low heat to speed the process.


Today when we went to hang our now prune sized shrunken heads, they looks a little lonely so we went on a nature walk to gather up a few more supplies.


Then we made a shrunken head mobile and hung it at our front door.


Hendrix is eager for the neighborhood squirrels to make an attempt in eating our apples until they realize they can’t because the mobile is actually hanging behind the glass. I think he thought that was the funnest or at least funniest part of the whole project! A little too much AFV maybe?

Sunday, June 7, 2009

Cress heads


Unfortunately I forgot to take any photos at the last make activity but I am submitting proof that the event actually did take place.


I personally found this project to be one of my favorites for making with a 3 year old. It wasn’t one of those drag-on projects that sound really fun at first but end up becoming a time-consuming mess. All we did was wet a little cotton, sprinkle a little seed, paint a little face and voila—all through! Our seeds began sprouting by day 2 for an almost immediately satisfying result plus we learned a little bit about the science of gardening along the way.

(a photoshoot casuality)
After a few weeks of plant care, we decided to play a little barber shop and enjoy an egg salad sandwich with cress!


Thursday, April 23, 2009

Sugar and Spice to Say the Least!

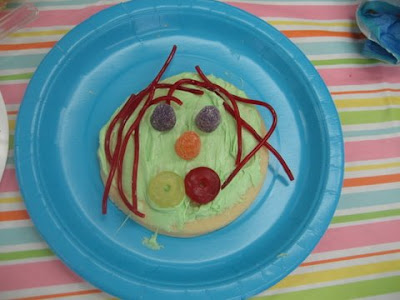
(face cookie designed by Oliver and his mom)

The April project was definitely the yummiest make to date! Our birthday themed make was put on by Jordan, Cambrie and their birthday girls; Bronwyn and Lenna.


The assignment at hand was to dress up stacks of homemade cookies and cupcakes the girls had supplied. Besides a rainbow-selection of frosting to decorate the homemade pastries, the girls had also brought gumdrops, licorice, lollipops, sprinkles, gummy candies, jelly beans and the list goes on! Sugar and spice say the least!


My favorite part was when we were able to partake in the "fruits of our labor" by eating our delicious creations!


We also made some new friends this month as we had some first time “Make-Monthly-makers” join the party. Thank you to all of those who attended our latest festivity and to those who were unable to be there, we’ll see you next time!
Related Posts with Thumbnails